How to Prepare for Interior Painting and Support Paint Durability
Use this interior painting preparation guide to protect floors, repair walls, caulk trim, choose primer, and prepare surfaces for a durable, polished finish.
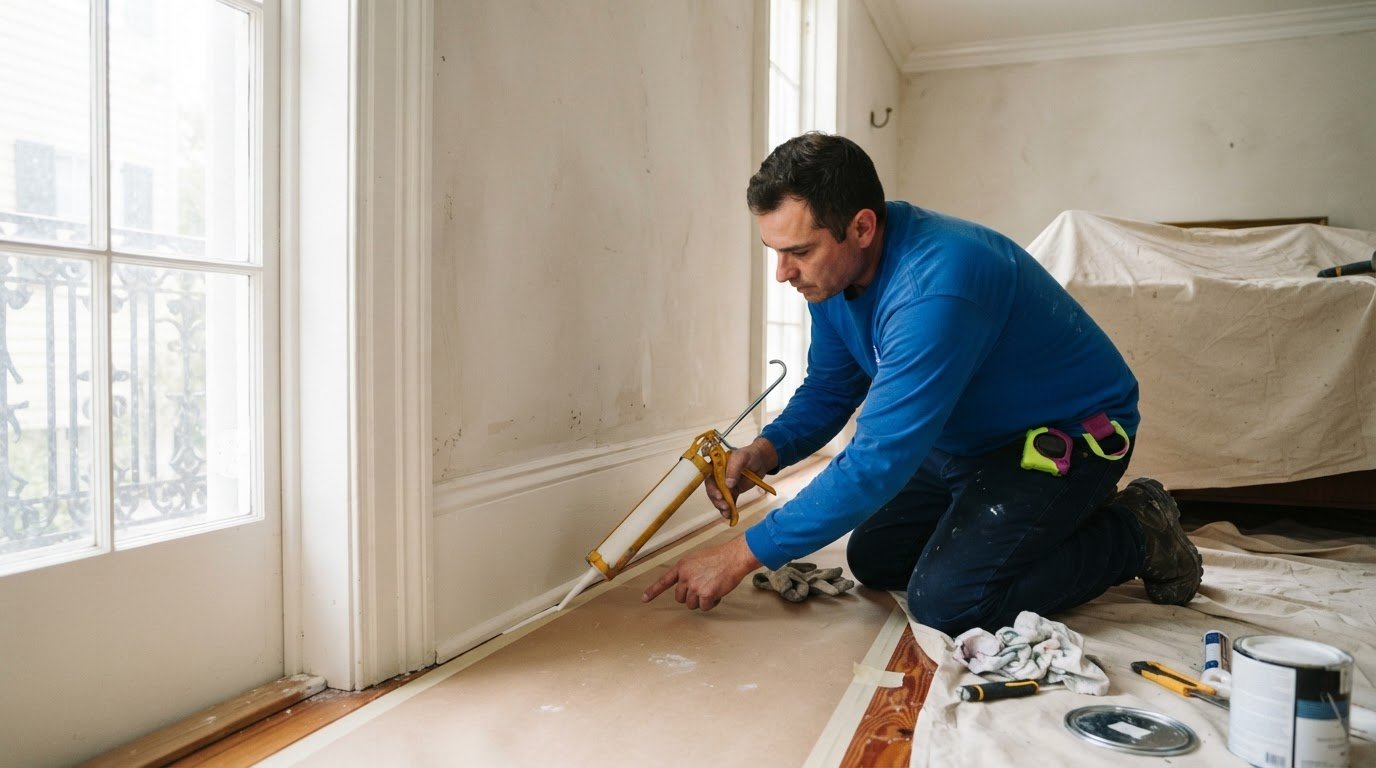
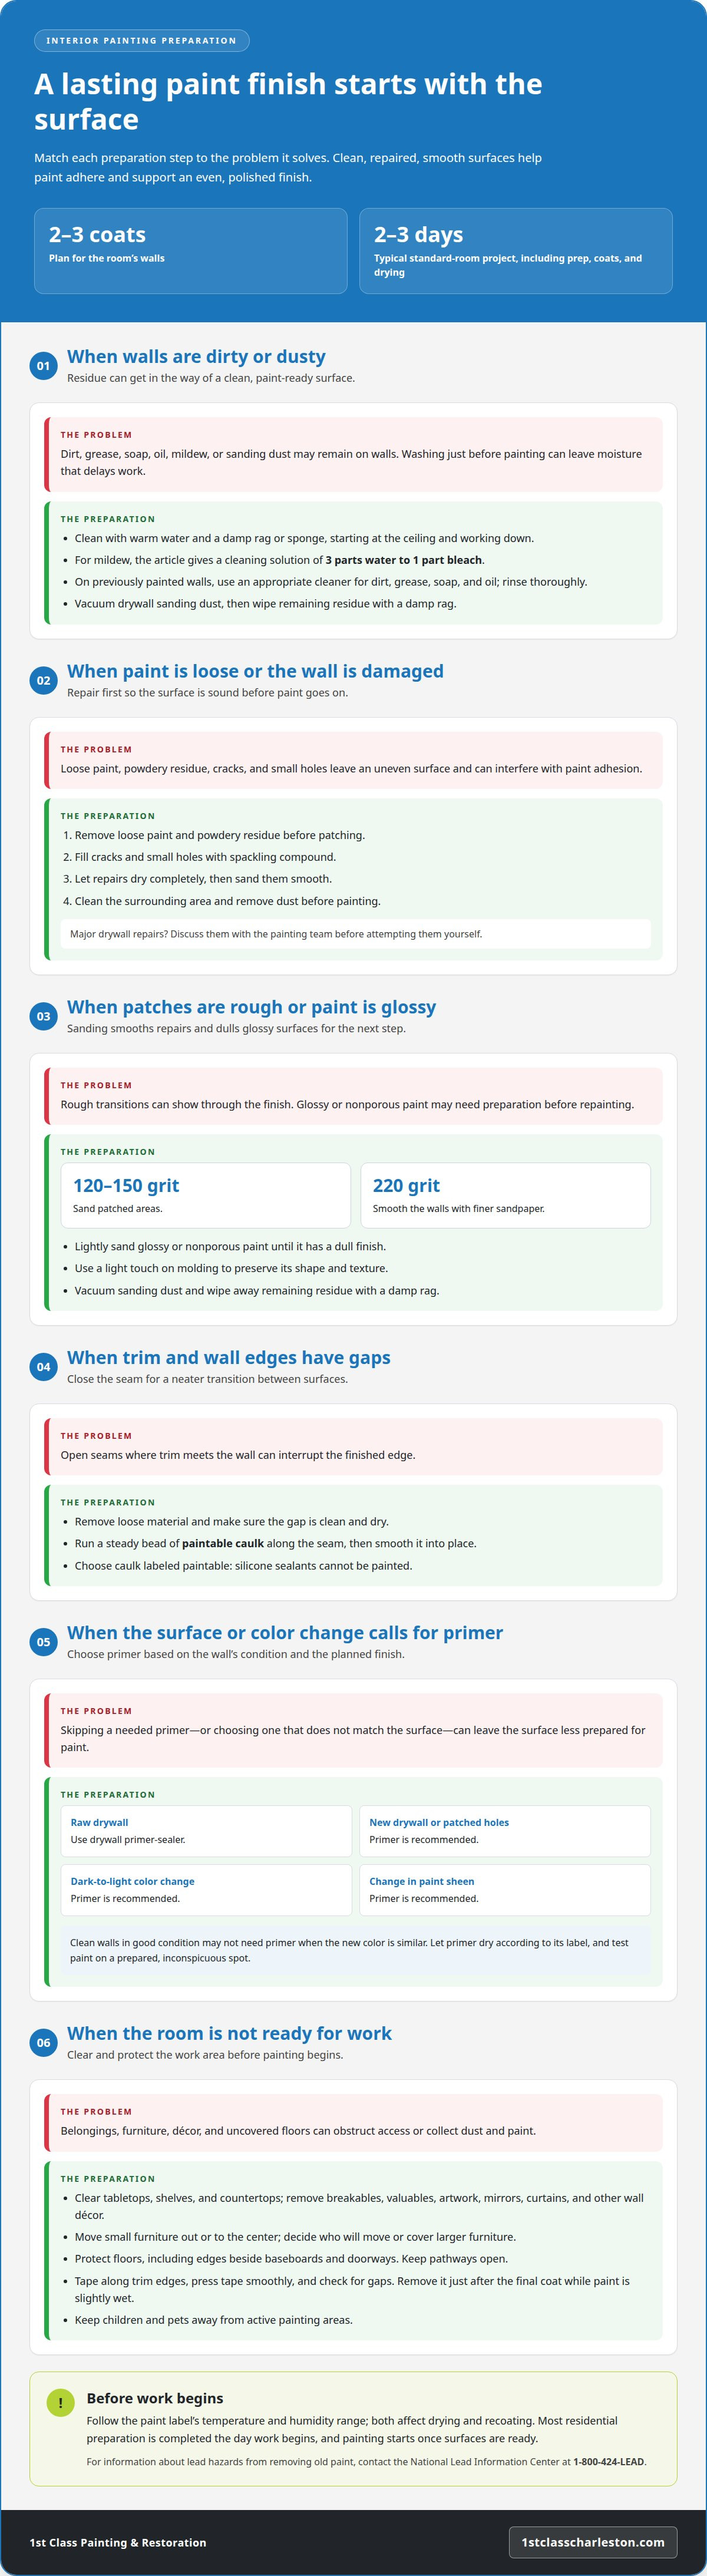
A durable paint finish starts before the first coat. Plan for two to three coats on a room’s walls, and give each coat a clean, smooth, properly prepared surface to adhere to. This interior painting preparation guide explains how careful prep supports a lasting result.
When planning a room refresh, it’s natural to focus on color and coverage. But dust, loose paint, unfilled holes, and gaps in the trim can all affect the finished look. Thoughtful preparation helps create even coverage and a clean, polished finish.
Learn how to plan the project, protect floors and belongings, remove wall decorations, caulk trim gaps, and prepare different surfaces before painting. You’ll also find out when primer matters and how preparation can help paint adhere.
Key Takeaways
- Clean previously painted walls, repair holes and cracks, then remove sanding dust so the surface is ready for paint.
- Clear breakables and wall décor, protect floors, and plan how larger furniture will be handled before work begins.
- Use paintable caulk to close gaps between trim and walls for a neater, more finished edge.
- Choose primer based on the wall’s condition and the planned color change, and test paint on a prepared, inconspicuous spot.
Planning an Interior Painting Project?
Prepare the room and inspect each surface before opening the paint. This helps identify cleaning, repairs, and sanding early.
-
Check Room Conditions and Preparation Time
Follow the paint label’s temperature and humidity range. Both conditions affect drying and recoating. Most residential preparation is completed the day work begins, and painting starts once surfaces are ready. A standard room typically takes two to three days, including preparation, multiple coats, and drying time. Keep children and pets away from active painting areas. For information about lead hazards from removing old paint, contact the National Lead Information Center at 1-800-424-LEAD.
-
Clean Walls and Remove Mildew
Clean walls with warm water and a damp rag or sponge, starting at the ceiling and working downward. For mildew, a cleaning solution can use three parts water and one part bleach. On previously painted walls, remove dirt, grease, soap, and oil with an appropriate cleaner, then rinse thoroughly. Vacuum drywall sanding dust, then wipe away any remaining residue with a damp rag before painting.
-
Repair Previously Painted Surfaces
Remove loose paint and powdery residue before patching. Fill cracks and small holes with spackling compound, let the repairs dry, then sand them smooth. Clean the surrounding area so grime won’t interfere with paint adhesion. Avoid washing walls immediately before painters arrive, since lingering moisture may delay painting. Discuss major drywall repairs with your painting team before attempting them yourself.
-
Sand Walls and Trim
Sand patched areas with 120-150-grit paper, then smooth walls with finer 220-grit sandpaper. Lightly sand glossy or nonporous paint until it has a dull finish. Use a light touch on molding to preserve its shape and texture. After sanding, vacuum dust and wipe away any remaining residue with a damp rag. A clean, smooth surface is ready for the next preparation step.
Protecting floors and removing wall decorations
Clear the work area before painting begins. A tidy room makes it easier to protect floors, belongings, and fixtures.
-
Move Furniture and Valuables
Clear tabletops, shelves, and countertops, then move small furniture to another room or the center of the work area. Remove breakable belongings and valuables, including anything that could collect dust or get paint on it. Decide how large furniture will be moved or covered, and clarify who will handle the prep. Keep pathways open so painters can reach the walls without brushing against furniture.
-
Remove Wall Decorations
Take down artwork, mirrors, and wall-mounted décor before painting. Remove curtains and other window treatments, too, so the areas around windows are accessible. Disconnect electronics and move them away from the walls. Store fragile pieces outside the room rather than beneath covered furniture. Check shelves and ledges for small items that could fall during preparation.
-
Protect Floors, Furniture, and Fixtures
Cover floors with protective cloths, paying attention to edges beside baseboards and doorways. Cover any large furniture remaining in the room, and keep the covering secure as work progresses. Clear access to outlets and switches so painters can reach them easily. Remove mounted fixtures if they obstruct the painting area; don’t leave them in place when their removal is uncertain. Professional painters often handle masking and floor protection, so set responsibilities before work begins—established contractors such as Colorado Springs Painters, for example, routinely manage comprehensive prep work and masking as part of their service.
-
Tape Trim and Protect Outlets
Place painter’s tape along the trim edge, parallel to the wall, rather than on the wall. Press the tape down smoothly to limit paint seepage and help create a crisp finish. Keep tape aligned around molding and other edges, and check for gaps before painting. Remove tape immediately after the final coat, while paint is slightly wet, to reduce the risk of lifting fresh paint. For help planning interior painting work, use a clear room-preparation plan.
Caulking gaps between trim and walls
Prepare each surface according to its material and condition before painting. For drywall, plaster, wood, and previously painted walls, clean and repair the surface, let repairs dry, then sand smooth. Raw drywall needs drywall primer-sealer.
- Run paintable caulk along open seams where trim meets the wall. First remove loose material and make sure the gap is clean and dry. Apply a steady bead, then smooth it into the seam for a neat transition. Silicone sealants cannot be painted, so choose caulk labeled paintable before starting.
- Patch cracks and small holes with spackling compound, then let each repair dry completely. Sand the patch smooth with sandpaper, blending its edges into the surrounding wall. Remove dust before priming, since residue can interfere with adhesion. If drywall damage is major, discuss the repair with the painting contractor before attempting it yourself.
- Match preparation to the surface. On previously painted walls, remove loose paint and powdery residue, clean away dirt or grease, and rinse thoroughly. For glossy paint, lightly sand until the finish looks dull. On wood trim, clean the surface and smooth rough areas without sanding away its shape. Let washed surfaces dry before continuing.
- Prime when the surface or color change calls for it. Primer is recommended for new drywall, patched holes, dark-to-light color changes, and changes in paint sheen. Use drywall primer-sealer on raw drywall. Clean walls in good condition may not need primer when the new color is similar. Let primer dry according to its label before applying paint.
How preparation supports paint durability
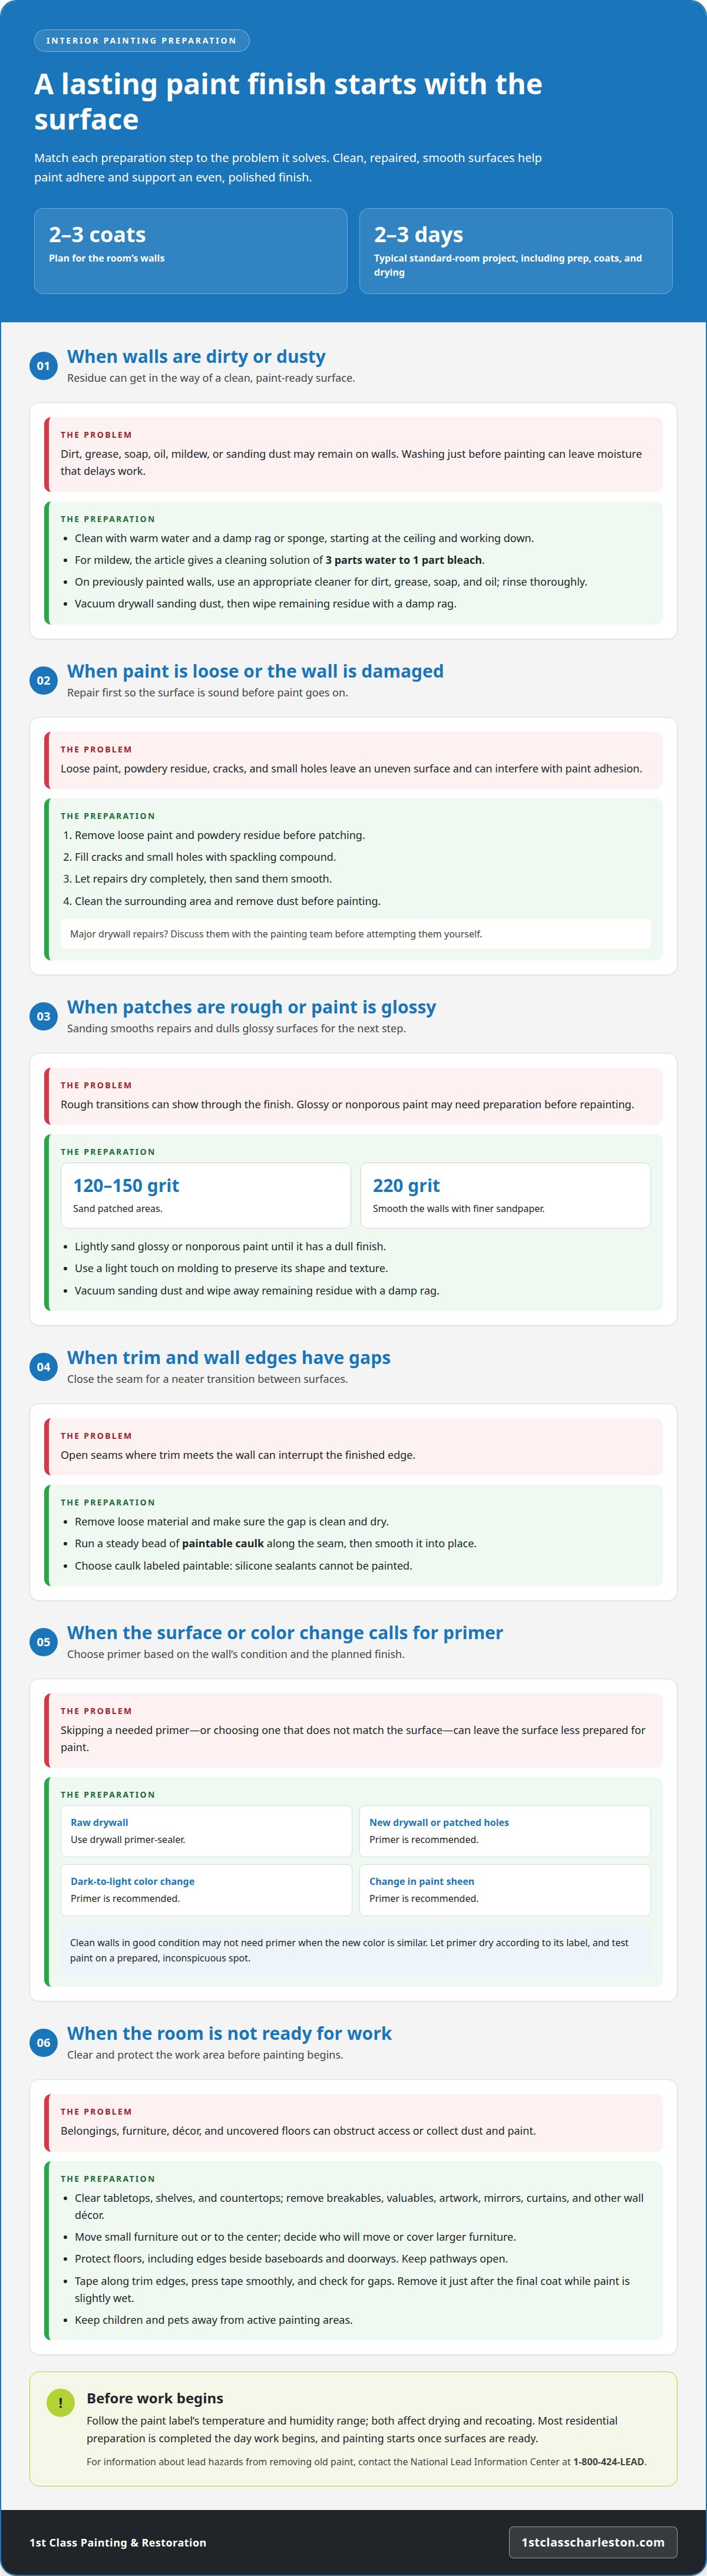
Paint lasts better when it bonds to a clean, sound, properly primed surface. This interior painting preparation guide connects each prep step to the finish it helps protect.
-
Prepare Surfaces for Durable Paint
Inspect areas around baseboards, windows, and corners before painting. Fill nail holes and cracks, then let repairs dry completely. Lightly sand rough transitions so the finish won’t highlight ridges or uneven texture. Remove sanding dust before applying primer or paint, since residue can interfere with adhesion.
Choose primer to suit the wall’s condition and planned color change. New drywall, patched holes, dark-to-light changes, and shifts in paint sheen call for primer. Raw drywall needs drywall primer-sealer, while tough marks or discoloration call for stain-blocking primer. These steps create a more consistent base for even coverage and adhesion.
-
Prevent Peeling and Uneven Coverage
Don’t paint over loose paint, powdery residue, grease, or damp repairs. Contaminants and moisture can keep paint from bonding well. Missed nail holes or cracks may remain visible beneath the finished coat. Inspect the wall beside windows and along baseboards, where uneven edges can stand out after painting.
Before coating the full room, test the intended paint on a prepared, inconspicuous spot. After the drying time specified on the label, check for adhesion or compatibility problems. The test shows how the prepared surface accepts the paint. Follow label directions for drying and recoating instead of rushing the next layer. Use this interior painting preparation guide as a reminder to assess the surface before applying the final paint.
For a carefully prepared finish, plan your interior painting project with experienced painting professionals.
1St Class Painting & Restoration: Interior Painting
1st Class Painting & Restoration provides interior painting for rooms that need a refreshed, carefully finished look. Bring in a painting team when you want help coordinating surface preparation, repairs, and paint application, or when several rooms need a consistent finish. Addressing these details together can make the project easier to plan and help create a cohesive result throughout your home.
For kitchen and bathroom painting, cabinet refinishing, or interior updates, the right approach depends on the surfaces and the changes you want to make. Share which rooms you’re updating and what you’d like to improve, such as worn walls, dated colors, or tired cabinets.
Contact 1st Class Painting & Restoration to discuss your interior painting project.
Make Your Next Room Refresh Count
The choices you make before painting can shape how smoothly a room comes together and how well the finish holds up. Use this interior painting preparation guide as a starting point, then decide which parts of the work you’d like to manage yourself and where a professional touch would help. For broader property upkeep across residential or commercial spaces, infrastructure and maintenance specialists like House of Maverick can help ensure your building is in top shape before interior updates begin. A thoughtful plan can turn a color change into a more cohesive update for your home.
1st Class Painting & Restoration offers interior painting, exterior painting, and kitchen and bathroom painting. Whether you’re refreshing one room or considering a broader update, the next step is to talk through the look and scope you have in mind.
Contact 1st Class Painting & Restoration to discuss your project and take the next step toward a refreshed space.
Frequently Asked Questions
How Many Coats Should You Paint?
Plan for two to three coats on room walls. Final coverage depends on the existing color, the new shade, and the surface condition. Follow the paint label’s instructions and let the first coat dry completely before applying another. For a change from dark paint to a lighter color, tinted primer can help reduce the number of topcoats needed.
What tools and materials are needed to prepare a room for interior painting?
Gather spackling compound, paintable caulk, sandpaper, a putty knife, cleaning supplies, painter’s tape, and floor-protective coverings. A damp rag or sponge helps clean walls, while a vacuum removes sanding dust. Keep primer available for raw drywall, patches, or substantial color changes. Choose materials based on the wall and trim conditions rather than treating every surface alike.
How do you protect floors, furniture, and fixtures before painting?
Move small furniture and breakable belongings out of the work area, then cover remaining furniture and floors with protective cloths. Clear shelves and countertops, take down curtains, and disconnect electronics before painting starts. Keep outlets and switches accessible for the painting work. For example, move a lamp and its cord away from the wall instead of leaving them beneath a furniture cover.
How should you clean walls before painting, including greasy or stained surfaces?
Use warm water and a damp sponge or rag, working from the top of the wall downward. For greasy areas, wash with an appropriate cleaner and rinse thoroughly so residue doesn’t remain beneath the paint. Tough marks or discoloration may need stain-blocking primer after cleaning. Let washed walls dry before painting, since moisture can delay work and affect when paint can be applied.
How do you fill holes and repair cracks in interior walls before painting?
Fill small holes and cracks with spackling compound, then let each repair dry before sanding it smooth. Remove dust afterward so it won’t interfere with paint adhesion. Check the repair in angled light, which can reveal ridges that are harder to see straight on. For major drywall damage, discuss the repair with your painting team before attempting it yourself.
When should you use primer before interior painting, and what type is best?
Use primer on new drywall, patched holes, dark-to-light color changes, or when changing paint sheen. Raw drywall calls for drywall primer-sealer, while tough marks or discoloration call for stain-blocking primer. On clean walls in good condition with a similar new color, primer can generally be skipped. Follow the product label for application and drying before adding paint.