How to protect floors during painting with rosin paper
Learn how to protect floors during painting with rosin paper, painter's tape, and careful edge protection to prevent drips, scuffs, and shifting before you b...
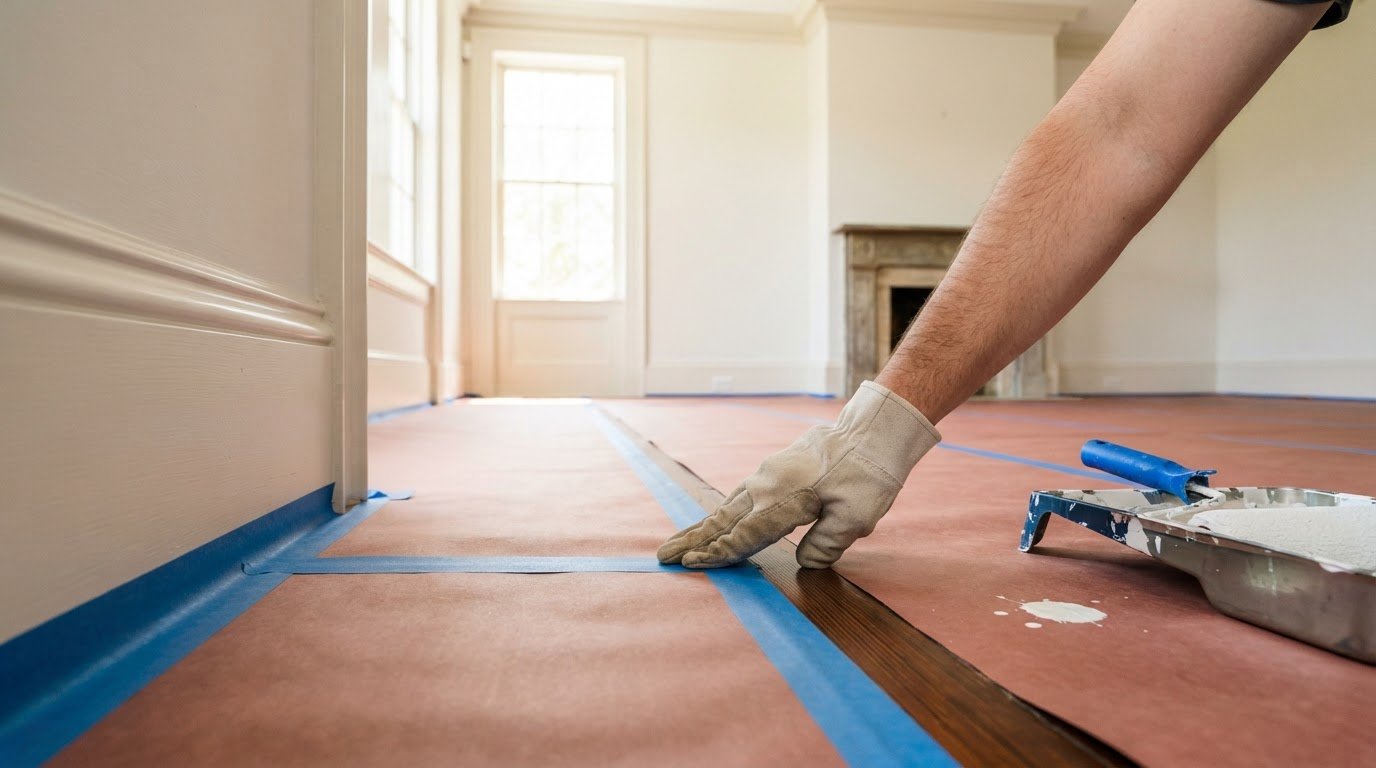
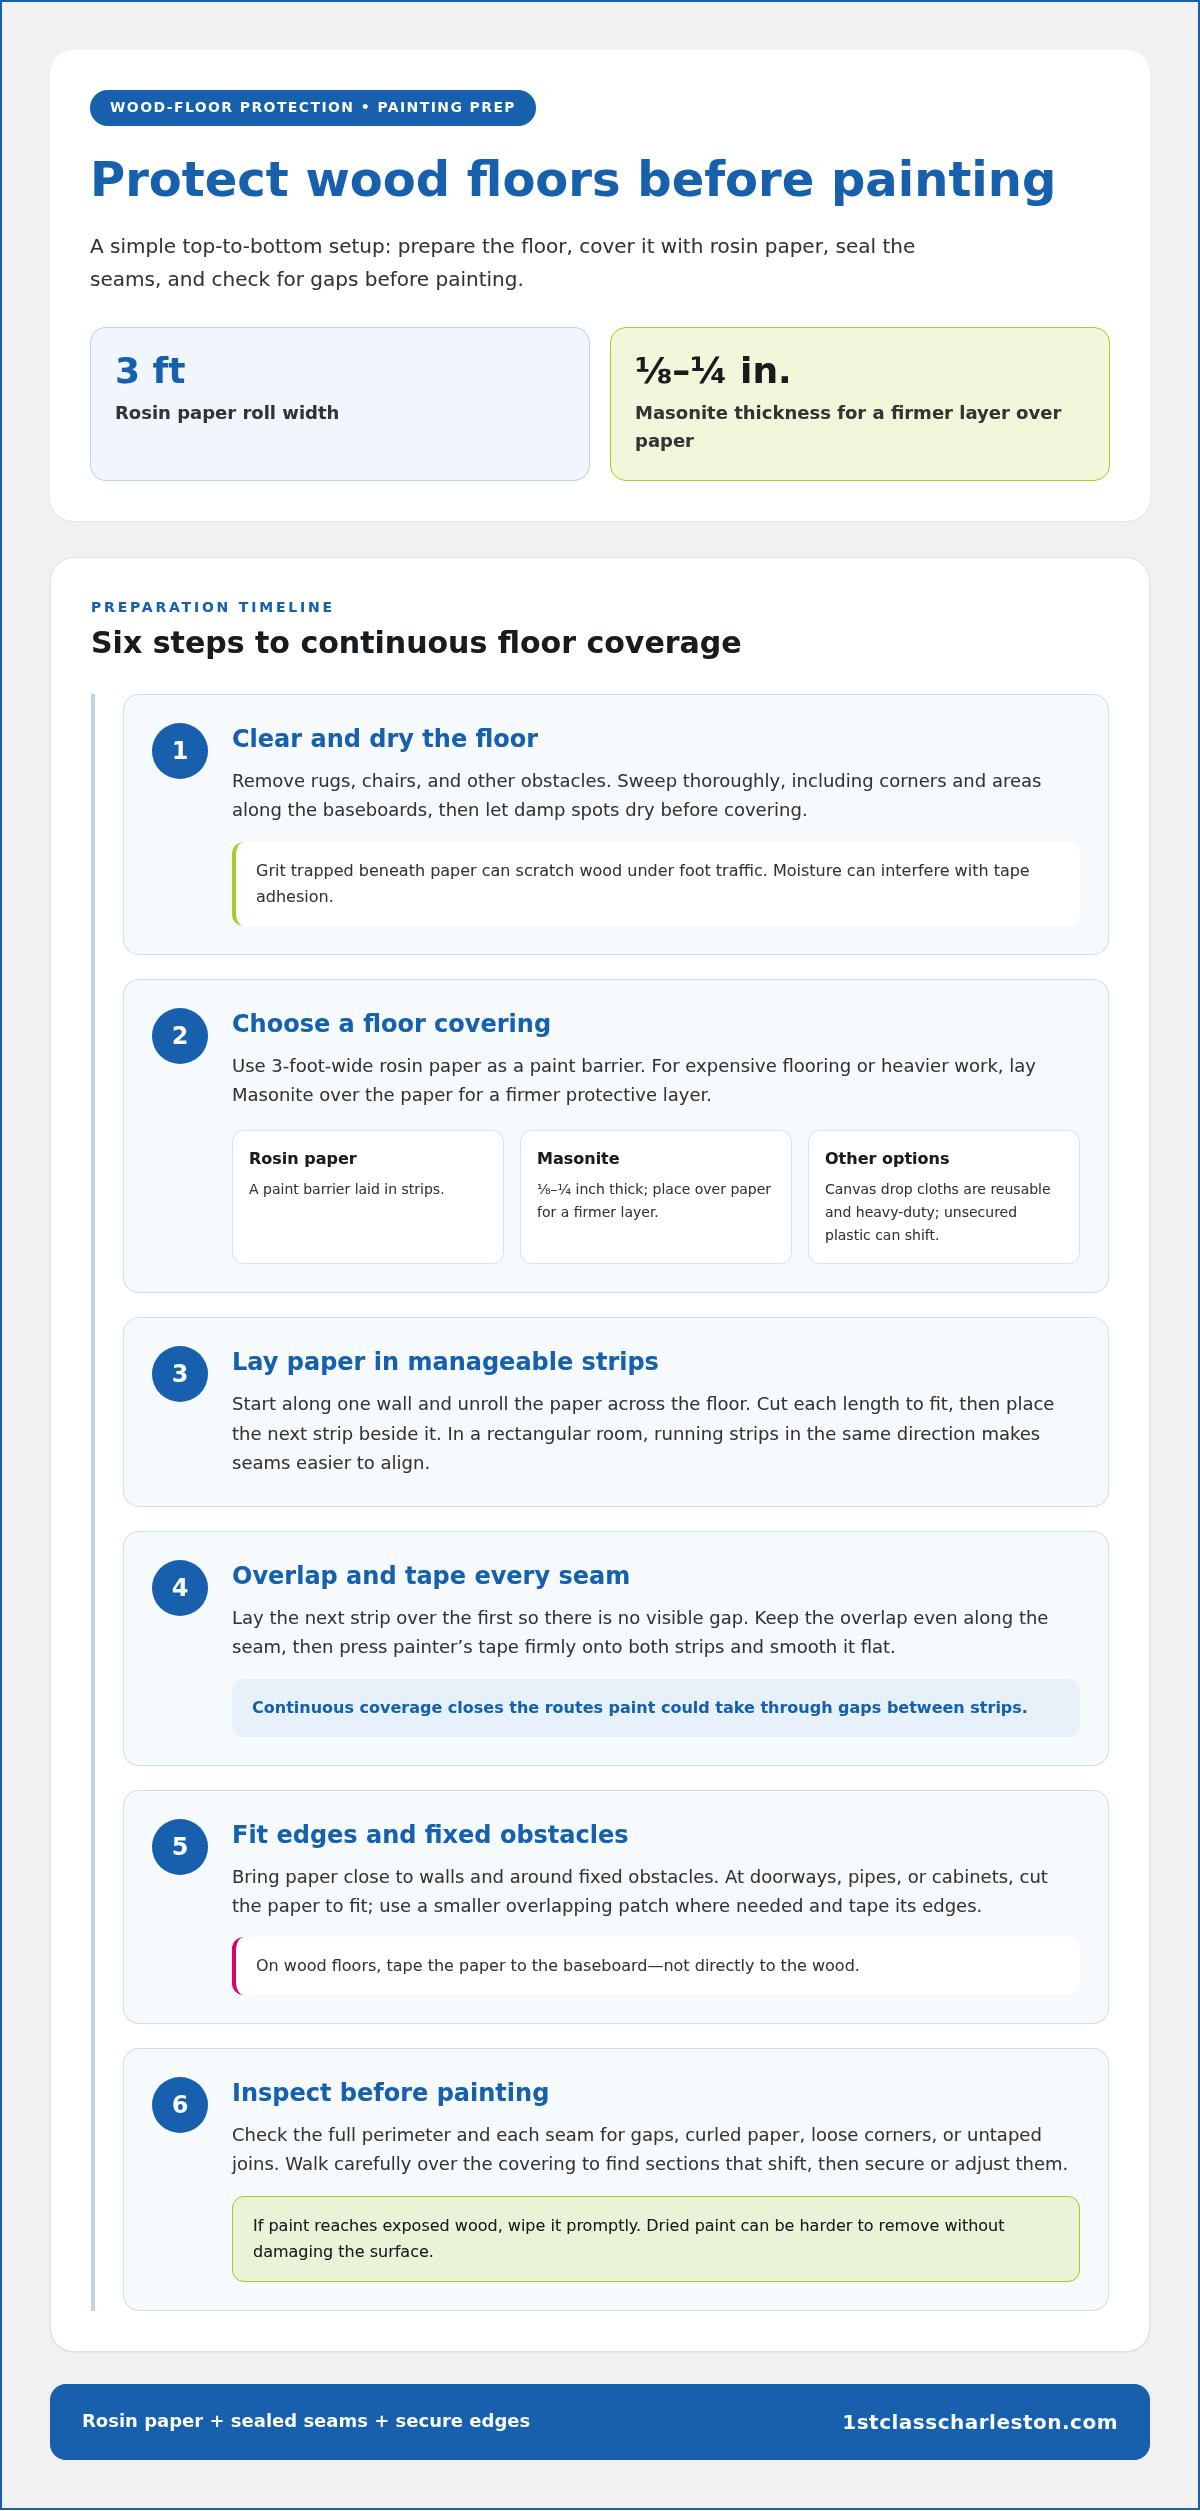
To learn how to protect floors during painting, start with 3-foot-wide rosin paper laid in strips across the floor. Overlap the edges and tape the strips together to help keep paint from reaching the surface below. On wood floors, secure the paper to the baseboards rather than taping directly to the floor.
Good preparation makes painting more manageable and helps protect your floors from drips and scuffs. Cover the entire work area, close gaps between paper strips, and secure loose edges so they do not shift underfoot.
These steps explain how to lay rosin paper, overlap and secure it with painter’s tape, and protect floor edges by taping the paper to the baseboard. A little care before the first brushstroke helps leave the room ready to enjoy when the painting is done.
Key Takeaways
- Clear debris and moisture from the floor before applying tape so it can adhere properly.
- For valuable flooring, consider adding a rigid protective layer over the paper.
- Check for loose corners and edges before painting, and secure them to reduce trip hazards.
- Clean paint drips from wood promptly, since dried paint can be harder to remove without damaging the surface.
Covering wood floors with rosin paper
Rosin paper can be one option for covering a wood floor during painting. Canvas drop cloths are reusable and heavy-duty, while unsecured plastic can shift. Knowing how to protect floors during painting starts with choosing a covering suited to the floor and the work, a standard followed by professional teams like mypaintjob.com.sg that emphasize thorough surface protection during interior projects.
Before painting, move furniture, sweep away grit, and let damp spots dry. Dirt trapped beneath paper can scratch wood under foot traffic. Plastic sheets can wrinkle or slide, creating loose edges and trip hazards, so lay them flat and secure them.
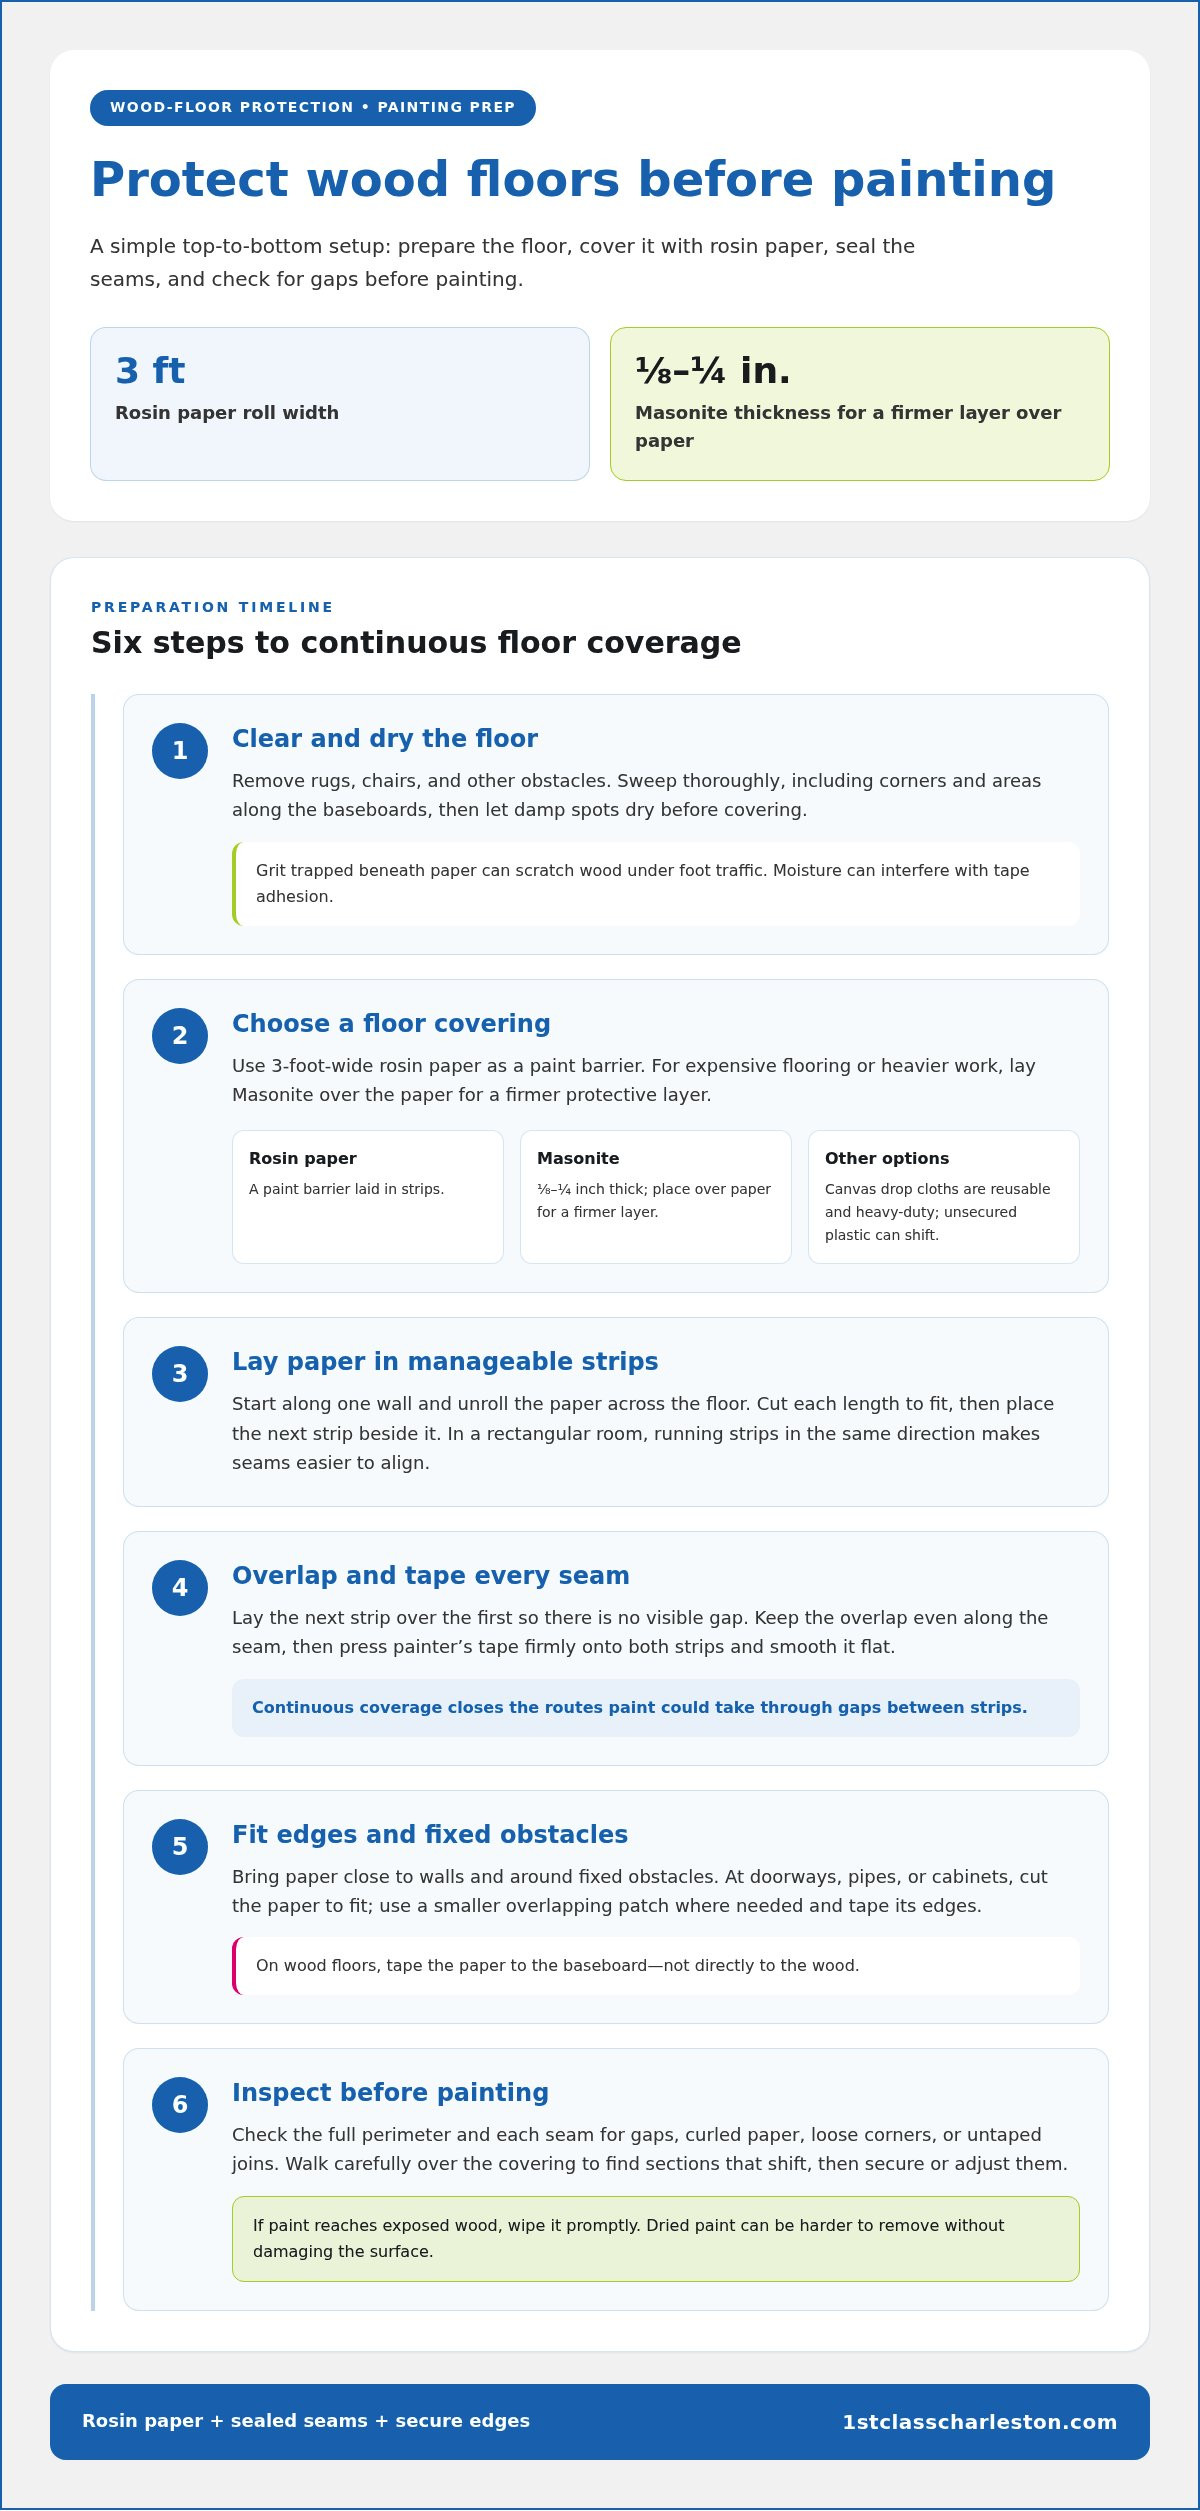
- Choose a suitable covering. Rosin paper rolls are 3 feet wide and work as a paint barrier. For expensive flooring, lay Masonite sheets measuring 1/8 to 1/4 inch thick over the paper. This creates a firmer layer for heavier work.
- Prepare the wood floor. Remove rugs, chairs, and other obstacles from the work area. Sweep thoroughly, including corners and along baseboards. Let damp areas dry before covering them, since moisture can interfere with tape adhesion.
- Lay paper in manageable strips. Start along one wall and unroll paper across the floor. Cut each length to fit, then place the next strip beside it. Covering the room methodically makes exposed patches easier to spot.
- Protect the floor edges. Bring paper close to the walls and around fixed obstacles. On wood floors, tape the paper to the baseboard rather than directly to the floor. This secures the edge without placing tape on the wood.
- Check the covering before painting. Press down loose corners and edges, then inspect the perimeter for gaps. To decide how to protect floors during painting, consider the floor finish, room layout, and planned work. Wipe paint from exposed wood promptly.
Overlapping protective paper
Estimate the floor area to work out how much covering you need, then allow extra for overlaps and edge cuts. The amount depends on the room’s shape, doorways, and obstacles.
- Plan the strip direction. Choose a starting wall and lay each strip toward the opposite side. In a rectangular room, running strips in the same direction makes seams easier to align. Check the far wall before cutting, since an angled edge may need a shaped piece.
- Place the next strip over the first. Don’t leave a visible gap between paper edges. Overlap the second strip across the first, creating a continuous barrier where paint might otherwise reach the floor. Keep the overlap even along the seam instead of allowing it to narrow near a corner.
- Tape each seam closed. Apply painter’s tape along the joined edges, pressing it firmly onto both paper strips. Smooth the tape by hand so it lies flat without wrinkles. A loose seam can lift as people walk across it, exposing the floor beneath during painting.
- Fit paper around obstacles. At a doorway, pipe, or fixed cabinet, cut the paper to meet the edge neatly. Add a smaller patch where the main strip cannot cover the floor. Overlap that patch onto the surrounding paper, then tape its edges to prevent an open route for drips.
- Inspect the full coverage. Follow each seam from one end to the other, checking for gaps, curled paper, and untaped joins. Walk carefully across the covered area to find sections that shift underfoot. Add tape or adjust the overlap before bringing paint, trays, or tools into the room.
Overlap rosin paper strips and tape them together to create continuous coverage across the room. Include alcoves and broad doorways when estimating material, not just the main floor area. Offcuts can cover small patches if their edges overlap the main paper and are secured. A continuous covering helps keep paint from reaching the wood through gaps.
Securing floor protection with painter’s tape
Use painter’s tape to hold coverings in place and secure exposed edges. Before painting, make sure the floor and the areas where tape will stick are clean and dry.
-
Protect Carpet, Tile, and Vinyl
Cover carpet, tile, or vinyl before painting walls or trim. Thick plastic sheeting can protect the floor if you tape down its edges and secure it to the walls. For firmer carpet protection, place hardboard over the covering and tack it through the carpet into the wooden floor beneath. Keep edges flat to avoid trip hazards.
-
Avoid Gaps Beneath Floor Coverings
Press tape firmly along covering edges, seams, and cutouts around cabinets or doorways. Dust or moisture can stop tape from adhering, and foot traffic can lift loose edges. Check corners and perimeter edges before painting, then secure any paper or plastic that shifts. Keep edges flat so paint cannot seep underneath.
- Secure the covering on a clean surface. Sweep away grit and dry damp areas before taping. Dirt and moisture can prevent painter’s tape from sticking properly. Apply tape to the covering’s edge and press it down without pulling the material into wrinkles. For pre-taped masking film, use its adhesive strip to hold the covering in place and help prevent gaps.
- Deal with paint drips promptly. Blot fresh spills on wood as soon as you spot them. Dried paint can be difficult to remove, and scraping or using solvent may damage a wood floor. Avoid aggressive scraping on tile or vinyl too, since it may mark the surface. Keep a cloth nearby and clean drips before they dry.
When using pre-taped masking film, attach it to the floor with its adhesive tape and press it into place. This helps keep the covering from moving and leaving gaps. Check that the film stays attached while painting, and secure any portion that shifts.
Taping paper to the baseboard
Along wood-floor edges, use the baseboard as the anchor point for rosin paper. This keeps painter’s tape off the floor and covers the narrow boundary where drips can land.
- Clear the baseboard edge. Move furniture away and remove dust from the contact area. Dirt or moisture can stop painter’s tape from sticking firmly. Let the baseboard dry, then check its full length for corners, gaps, or obstacles that need careful paper fitting.
- Position the paper beside the wall. Unroll the paper until its edge meets the baseboard. Keep the paper flat against the floor, without bunching it where the wall meets the wood. Work along one wall at a time, so you can keep the paper aligned as you secure it.
- Attach the paper to the baseboard. Press painter’s tape over the paper edge and onto the baseboard. Smooth it along the wall, keeping the tape off the wood floor. At a doorway, trim the paper to fit the opening, then tape its edge to the baseboard where one is present.
- Shape paper around corners. At an inside corner, fold or cut the paper so it lies flat instead of forming a raised pocket. Secure the overlap to the baseboard with tape. Check outside corners and wall ends too, since an uncovered sliver can expose flooring beside the protective paper.
- Inspect the perimeter before painting. Follow the taped edge around the room and press down any lifted sections. Look closely behind doors, beside trim, and around fixed cabinets. If paper pulls away from the baseboard, reposition it and retape before setting paint trays or tools nearby.
For a room-wide refresh, explore professional interior painting and let experienced painters handle the preparation and finish.
For broader coverage, overlap adjoining rosin paper strips and tape them together, which helps keep the protective layer continuous as you work. A 36-mil paper floor covering is a common choice for protecting hard flooring while painting. Rosin paper for protecting floors is available at hardware and home improvement stores, so you can choose a suitable covering before preparing the room. Keep the strip edges joined and the paper lying flat as it meets the taped perimeter.
1St Class Painting & Restoration: Interior Painting
1st Class Painting & Restoration provides interior painting for rooms that need a refreshed, carefully finished look. If you’d rather leave the preparation, painting, and cleanup to experienced professionals, its team can help with your interior project. This can be especially useful when several rooms need attention or you want a cohesive finish throughout your home.
Thoughtful floor protection is one part of a well-managed painting project. The right covering depends on the flooring, room layout, and work being done, while careful preparation helps protect the surfaces you want to keep. 1st Class Painting & Restoration also offers kitchen and bathroom painting, cabinet refinishing, and exterior painting.
For help planning your interior painting project, contact 1st Class Painting & Restoration or visit 1stclasscharleston.com.
Make Your Next Painting Project Feel Simple
Knowing how to protect floors during painting gives you a practical starting point. If you’d rather focus on the vision and leave the painting work to professionals, 1st Class Painting & Restoration offers interior and exterior painting, along with kitchen and bathroom painting. Share what you hope to refresh and discuss the right next step for your home.
Contact 1st Class Painting & Restoration to talk about your painting plans. A more welcoming space can begin with one thoughtful decision.
Frequently Asked Questions
What materials are best for protecting floors while painting?
Choose floor protection based on the surface and the work involved. Rosin paper suits routine painting on hard flooring, while canvas is a reusable, heavy-duty option. For higher-impact work or especially valuable floors, add a rigid Masonite layer over paper. Plastic can cover large areas, but secure it carefully to prevent shifting and trip hazards.
How do you tape and secure drop cloths to protect floors?
Lay the covering flat, then use painter’s tape to join adjoining sections and secure exposed edges. At a doorway, trim the material to fit instead of leaving a loose flap in the walking path. Recheck the covering after moving paint supplies or furniture, since movement can loosen a seam or uncover part of the floor.
How do you protect hardwood floors from paint spills and scratches?
Cover hardwood with rosin paper, and add Masonite sheets for a firmer barrier against heavier activity. Avoid trapping grit underneath, since foot traffic can press debris against the finish. If paint reaches exposed wood, wipe it promptly. Scraping dried paint or using solvent can damage the floor.