Kitchen Island Installation in Charleston: Costs and Timelines
Plan your kitchen island installation Charleston project with insights on costs, timelines, seating, materials, storage, and local permit requirements.
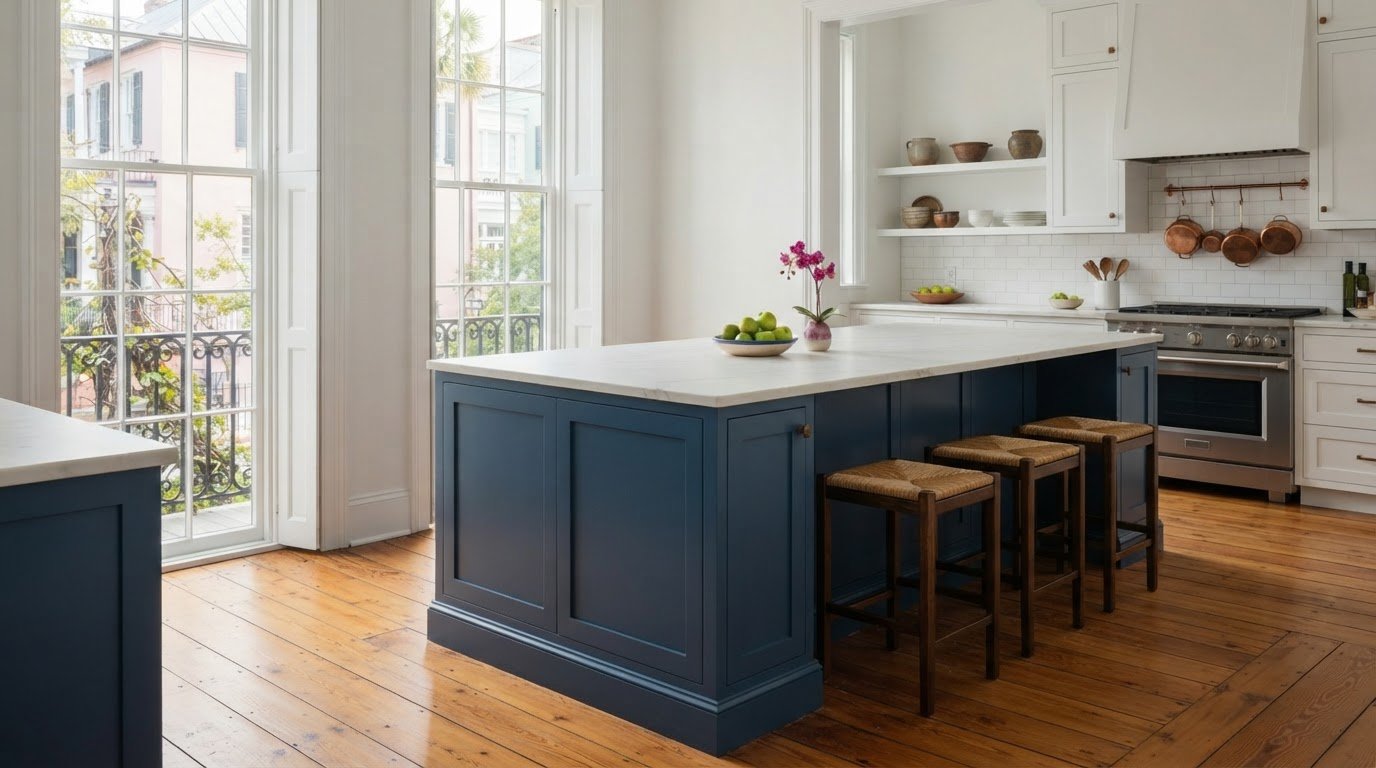
A kitchen island’s layout can make or break how comfortably your kitchen works. For kitchen island installation in Charleston, costs and timelines depend on the island’s size, storage and seating plan, material and finish choices, and the work involved in fitting it into your kitchen. The right design balances gathering space with room to cook and move around.
It’s natural to focus on the island’s look, but practical choices matter just as much. This guide explains how seating height and arrangement affect the layout, which design decisions shape project costs and timing, and how to choose materials and finishes for everyday use. You’ll also see how storage options can help the island serve as a welcoming place to gather without losing its usefulness as a workspace.
Key Takeaways
- Plan seating around the island’s height, the number of people who’ll use it, and comfortable spacing between stools.
- Understand how the island’s size, features, materials, and project scope shape its cost and timeline.
- Choose durable countertop and cabinet finishes that suit daily use while giving the island a look of its own.
- Learn what to consider when determining whether your Charleston island project may require a permit.
Island seating height and layout
Start by deciding how people will use the island, then choose its seating arrangement. Stools along one side leave the opposite side open for cooking or storage. Seating on multiple sides creates a conversation area, which can work well when guests gather while someone prepares food. Match the island height with seating designed for that surface, rather than choosing stools by appearance alone.
Plan for who will sit at the island and leave comfortable space between stools. A row that fits on paper may feel cramped once people are seated and someone is moving around the kitchen. Consider nearby cabinets, appliance doors, and the route between the island and the rest of the room. For example, a side-facing stool could block a cabinet drawer if the layout doesn’t account for both.
How do I find and compare kitchen island installers in Charleston, SC? Compare project proposals by how clearly they address the island’s height, seating arrangement, circulation, storage, and any utility work. A showroom visit can help you compare cabinet finishes and stool styles, but the plan should reflect your kitchen’s actual dimensions and daily routines.
What electrical, plumbing, or gas permits are required for a kitchen island in Charleston? Seating alone doesn’t determine permit needs. Adding or changing wiring, water lines, drains, or gas connections changes the project scope. Applicable requirements depend on the work and local rules, so distinguish a seating-and-cabinet plan from one that alters utilities.
Are there Charleston-specific building code or historic district rules for kitchen remodels? Requirements can depend on the property’s location and the work involved. A cabinet-and-seating change differs from a project that alters utilities or the building, so location and scope matter when identifying relevant local review.
Common installation problems include cramped stool spacing, blocked cabinet access, and storage lost to a sink or appliance. Map stools, drawers, and appliance doors together before finalizing the layout. For kitchen island installation in Charleston, a coordinated plan helps keep seating, storage, and utility choices from working against each other.
Installation costs and timelines
Island costs depend on what the project includes, not just the finished cabinet. The price depends on the project and is given after a quote request; key factors include island dimensions, cabinet and countertop choices, site preparation, and utility changes. A simple cabinet island has a different scope from one that needs new plumbing, electrical work, or substantial floor preparation.
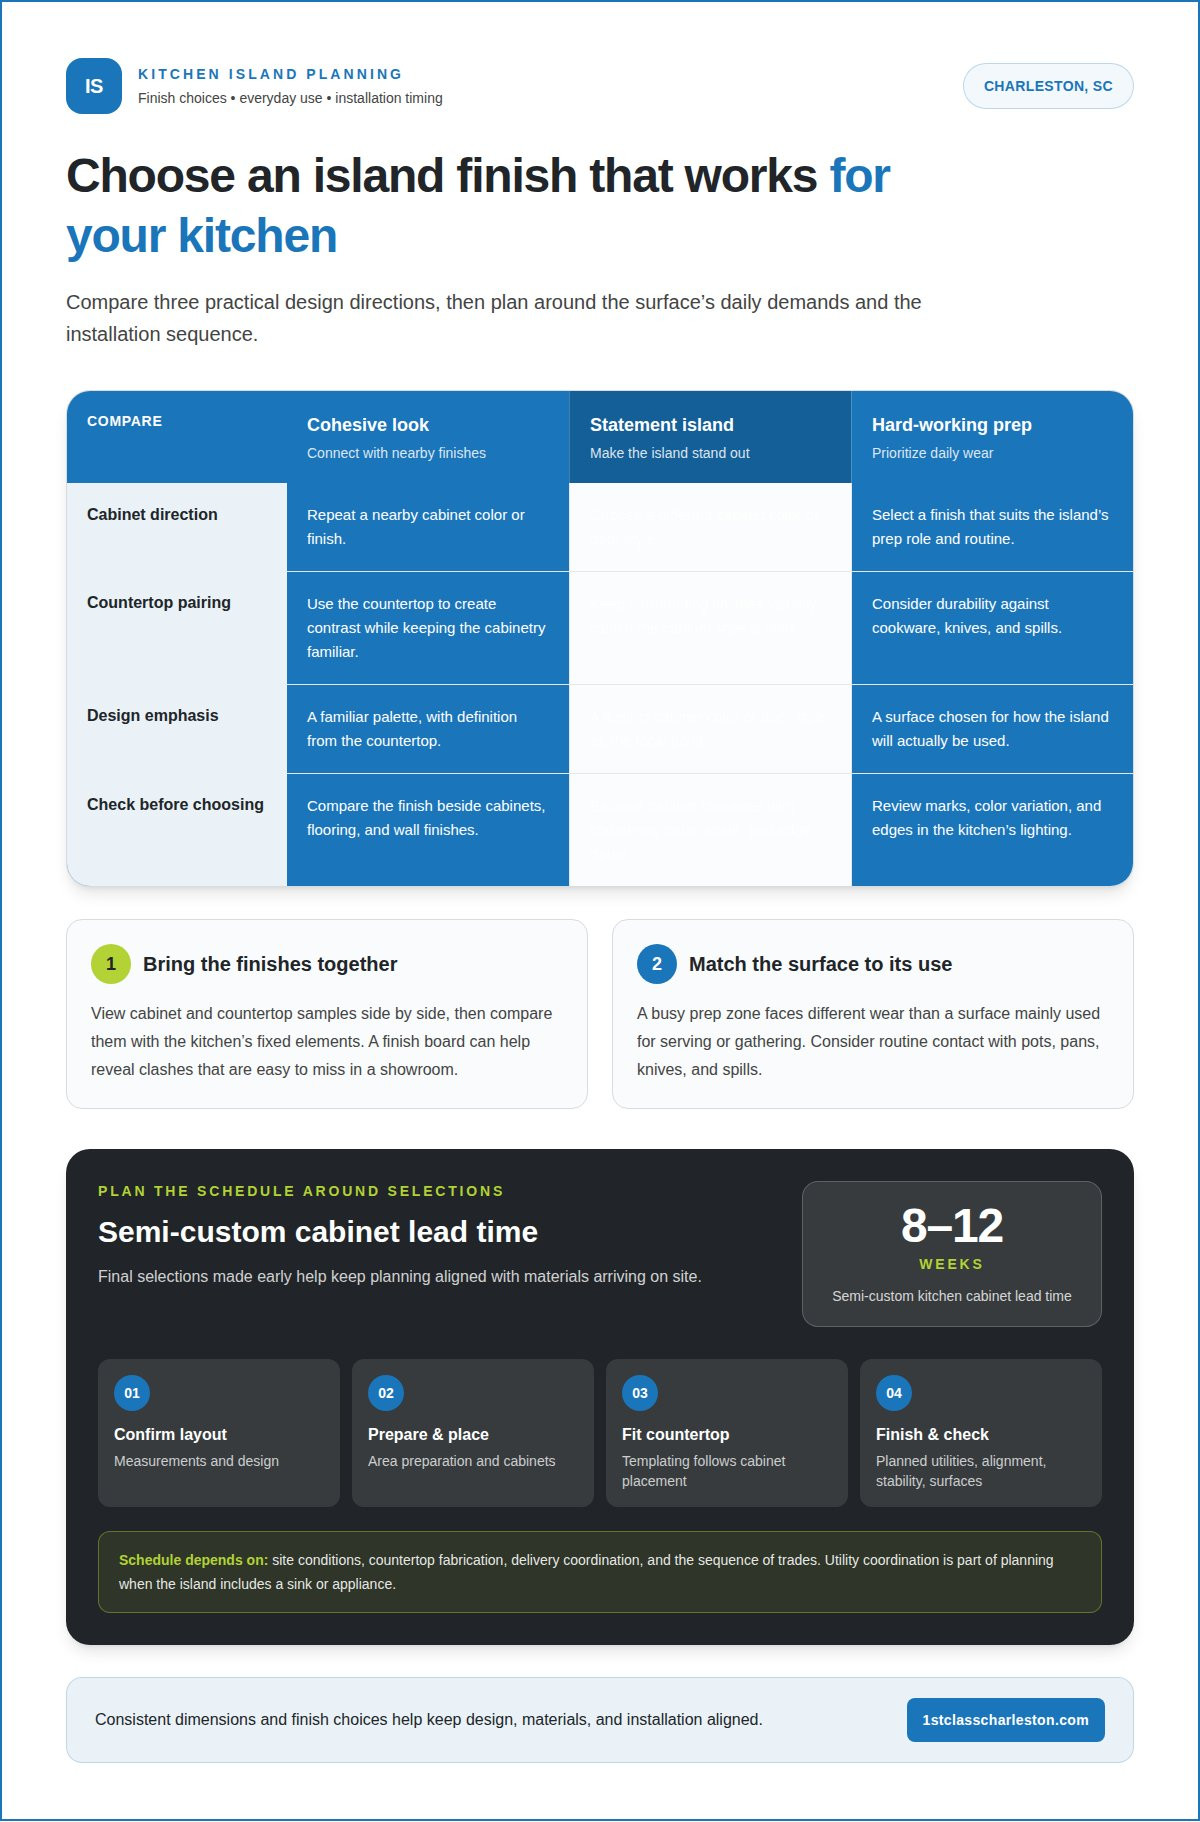
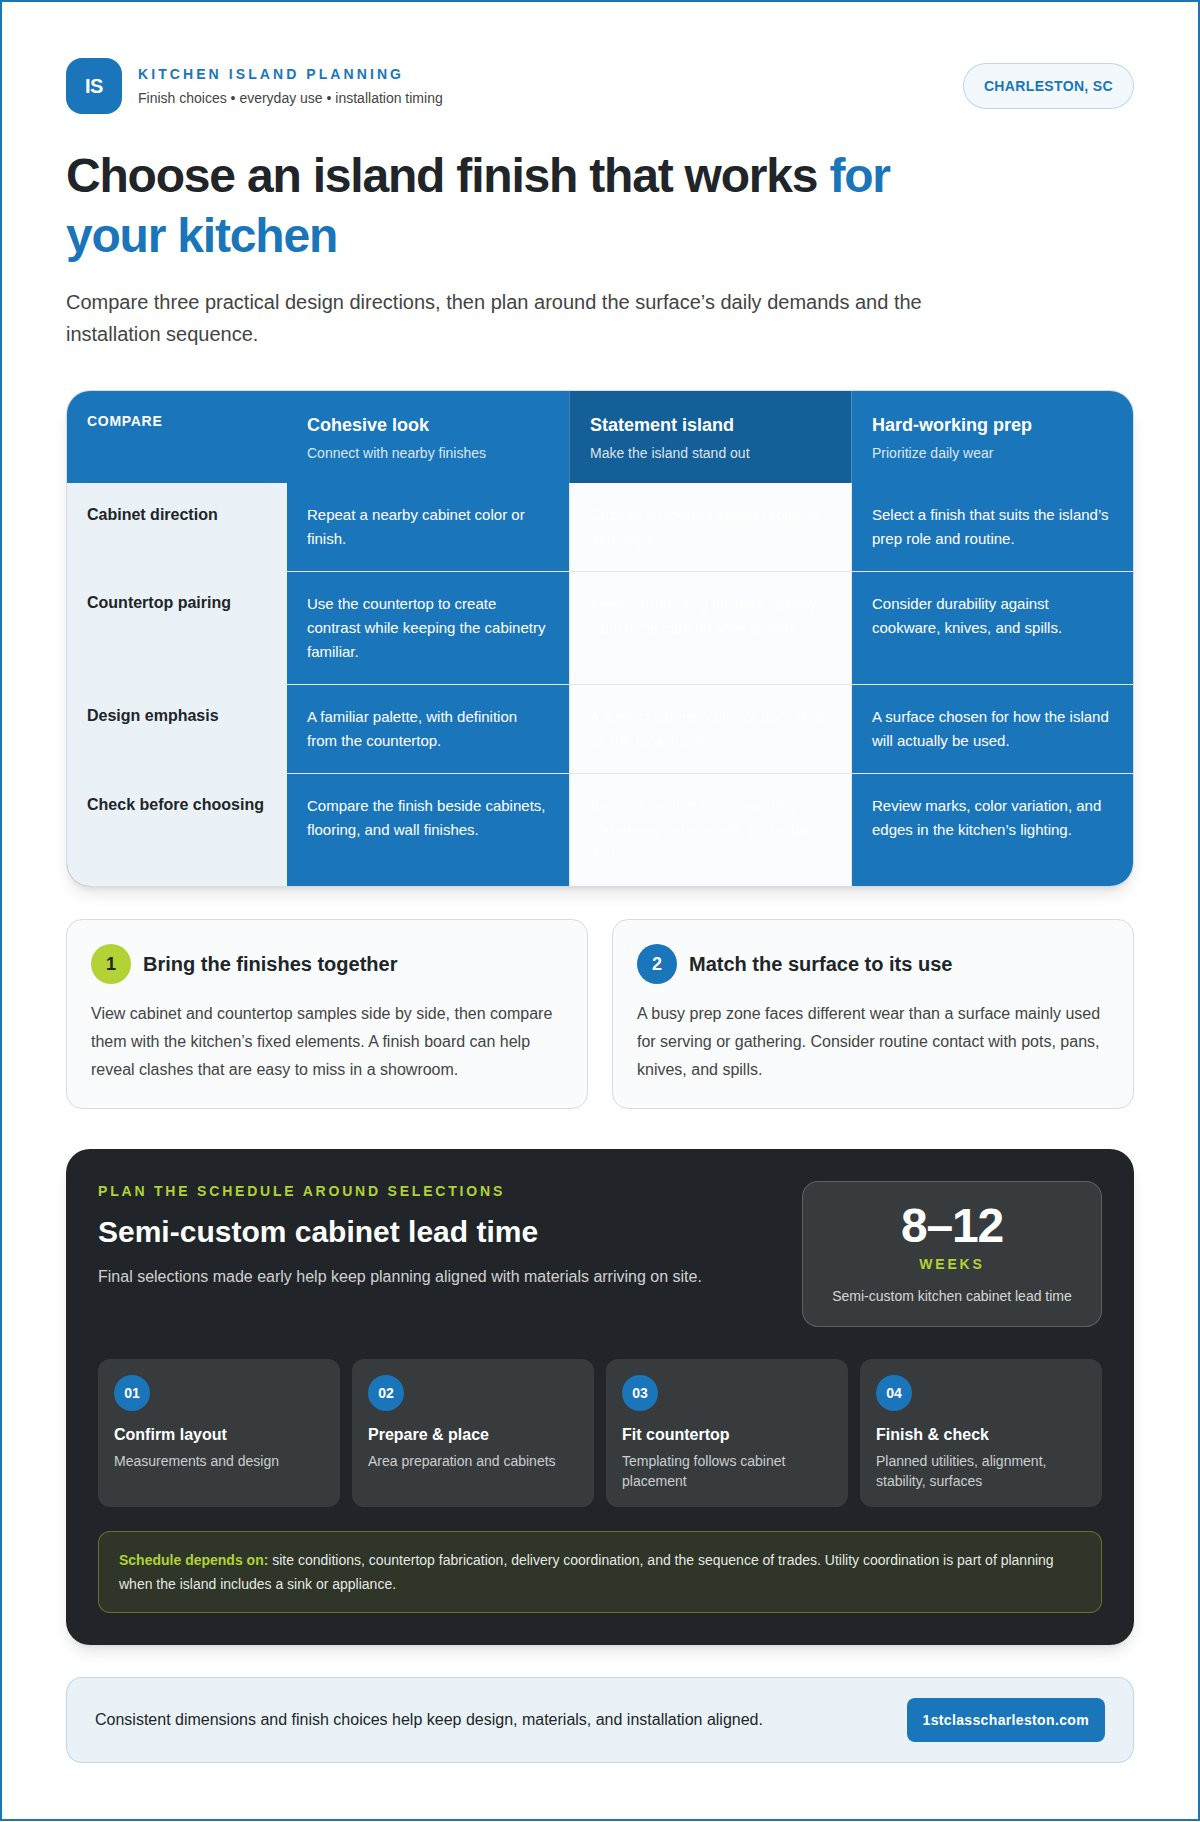
Timelines also reflect decisions made before installation begins. Semi-custom kitchen cabinets have lead times of 8-12 weeks, which can shape the project schedule. Once cabinetry is ready, site conditions, countertop fabrication, delivery coordination, and the sequence of trades affect when the island can be completed. Final selections made early help keep planning aligned with materials arriving on site.
What are the steps for installing a kitchen island? The team first confirms the layout and measurements, then prepares the area and positions or assembles the island cabinets. Next, the countertop is fitted, planned utility connections are completed by the appropriate trades, and the team checks alignment, stability, and finished surfaces.
Each phase depends on the one before it. Countertop templating, for example, generally follows cabinet placement, so a change in cabinet dimensions can affect the countertop schedule. If the design includes a sink or appliance, utility coordination becomes part of planning before the island is finished. Keeping the design, measurements, and material choices consistent reduces avoidable adjustments during installation. For larger renovation concepts, exploring projects by custom design specialists like Delmar Kitchen Pro can offer practical inspiration for coordinating high-end finishes and full-scale kitchen construction.
Before work begins, define the island’s intended use, storage, finish, and included features. That gives the project team a clear scope for planning materials and sequencing work. If the island is part of a broader room refresh, a coordinated kitchen update can help the new centerpiece feel integrated with its surroundings.
Material and finish selection
Choose an island finish that suits your kitchen and daily routines. You can make the island a focal point with a cabinet color, door style, or countertop that differs from the surrounding cabinetry. A contrasting cabinet color adds definition, while a matching countertop can visually connect the island to the perimeter counters. The strongest choice feels intentional beside nearby cabinets, flooring, and wall finishes.
Start with the countertop’s working demands. Pots, pans, knives, and spills can all reach this surface, so consider durability as well as appearance. Think about how the island will be used: a busy prep zone faces different wear than a surface mainly used for serving or gathering. Review samples in the kitchen’s lighting and compare how visible marks, color variation, and edges look beside existing finishes.
Coordinate the cabinet finish and countertop rather than selecting each in isolation. A bold door style may already add visual interest, so a quieter surface can keep the island balanced. A distinctive countertop, in contrast, can stand out against simpler cabinet fronts. Experienced remodeling contractors such as Lotz Renovations, Inc. recommend bringing the choices together as samples or a finish board, and viewing them beside the kitchen's fixed elements before deciding.
- For a cohesive look: Repeat a nearby cabinet color or finish, then use the countertop to create contrast.
- For a statement island: Choose a different cabinet color or door style, and keep surrounding finishes visually calm.
- For a hard-working prep surface: Prioritize countertop durability against routine contact with cookware, knives, and spills.
Before ordering, confirm that the countertop and cabinet finishes work together in color, scale, and edge detail. A sample viewed beside the existing kitchen can reveal clashes that are easy to miss in a showroom. This final comparison helps you choose a polished island that suits both the room and the way it’s used.
Kitchen Island Permit Requirements in Charleston, SC
Permit needs depend on the work, not simply on whether the kitchen island is new. Replacing or adding cabinets without changing utilities differs from installing a sink, adding electrical connections, or altering gas lines. Those changes affect the project scope and the approvals that may apply in Charleston.
Describe the full project before work starts. Note whether the plan changes the island’s location, adds built-in appliances, or alters plumbing, electrical, or gas systems. A freestanding cabinet island is different from an island with a sink and powered appliances. This distinction helps identify which parts of the work may need review.
Charleston properties can also involve location-specific considerations. A kitchen inside a designated historic district may face review considerations beyond those for an interior update elsewhere. The property’s location and the type of alteration matter, especially if work affects more than movable cabinetry. Keep the island plan and scope together so relevant requirements can be identified before construction begins.
A practical sequence is to define the design, list every planned utility change, and establish whether the property has historic review considerations. Then determine applicable permitting and review steps before scheduling installation. A cabinet-only island and an island with a sink should not be treated as identical projects. Defining the complete scope helps prevent overlooked work from disrupting the sequence.
Permits and approvals are separate from the island’s finish decisions. A countertop or cabinet color choice doesn’t indicate whether the work changes building systems or affects a historically regulated property. Keep those design selections alongside, but distinct from, the project scope used to determine review needs. Clear documentation also helps everyone understand the planned work and what must happen before installation.
For a project that includes broader room improvements, connect the island plan with the overall kitchen remodel. Discuss your kitchen remodel as part of shaping a cohesive update.
1St Class Painting & Restoration: Kitchen and Bathroom Painting
1st Class Painting & Restoration can help bring the kitchen together with kitchen and bathroom painting, cabinet refinishing, and kitchen remodels. Once your island’s layout and materials are set, coordinated cabinet finishes and surrounding paint can help the new feature feel at home in the room.
Consider cabinet refinishing when existing cabinets need a refreshed appearance alongside the island. Kitchen and bathroom painting can also update the surrounding walls and surfaces, creating a more unified look. For broader changes, a kitchen remodel can address the room as a whole rather than treating the island as a standalone feature.
If you’re ready to plan the finishing touches for your Charleston kitchen, contact 1st Class Painting & Restoration to discuss your project.
Make the Next Kitchen Decision Count
A kitchen island installation in Charleston can become the starting point for a more considered room, not just a new feature. Think about how the island’s color, surrounding cabinets, and wall finish will work together once the project is complete. A cohesive finish can help the island feel connected to the home rather than added as an afterthought.
When you’re ready to shape that look, 1st Class Painting & Restoration offers interior painting, exterior painting, and kitchen and bathroom painting. These services can help carry your chosen style into the surrounding spaces and support a polished result. Consider the atmosphere you want each room to create, then choose finishes that bring that vision to life.
Contact 1st Class Painting & Restoration to talk about your project and the finish you have in mind. Your next step can bring the whole kitchen closer to feeling like home.
Frequently Asked Questions
What is the average cost to install a kitchen island in Charleston, SC?
The main cost factors are island dimensions, cabinet and countertop selections, site preparation, and utility work. A compact cabinet island has a different scope from a larger design with built-in features. A useful estimate should reflect the specific materials and work planned for your Charleston kitchen, rather than rely on a broad average.
What factors affect kitchen island installation costs in Charleston?
Project scope is the main cost driver. A design that requires floor repairs, changes to existing cabinetry, or careful coordination with other kitchen work involves different tasks from placing an island in a prepared area. Detailed storage features and the way the island must fit with surrounding finishes also shape the work. A clearly defined plan helps identify which items contribute to the final estimate.
How much do kitchen island materials and labor cost in Charleston?
Material and labor costs depend on the selected cabinet construction, countertop, finish, and installation requirements. Made-to-order cabinetry and a distinctive countertop involve different material choices from a straightforward cabinet setup. Labor reflects the assembly and fitting work, site preparation, and coordination required by the design. An estimate accounts for these choices together, rather than treating the island as one standard package.
How much clearance is needed around a kitchen island?
There isn’t one clearance figure that suits every Charleston kitchen; the layout needs to leave usable routes around the island. Planning accounts for nearby cabinet doors, appliance openings, and the paths people use while cooking or passing through. For example, an island placed near a dishwasher should allow its door to open without blocking the main route through the room.
How do I choose the right kitchen island size and layout for my kitchen?
Choose a size that supports the island’s main purpose without disrupting the kitchen’s daily flow. A prep-focused island needs usable work surface, while one designed for serving needs room for people to gather. The design should account for appliance locations, cabinet access, and routes between kitchen work areas. A scaled floor plan helps show whether the proposed footprint fits the room.
How long does kitchen island installation take in Charleston?
The timeline depends on project scope, material readiness, and coordination between installation tasks. A cabinet order can affect scheduling before on-site work starts, while a design change can shift later work, such as countertop fitting. The schedule should account for decisions, deliveries, and the condition of the installation area, so the planned sequence reflects the actual work rather than just assembly time.